最近做一个项目需要实现登录功能,感觉Java实现起来太麻烦了,看到有用PHP的,果断用起来,还是很方便
准备
- 因为是本地实验,所以用的XAMPP
- Android Studio 3.0
- HBuilder,主要是方便写php代码
开始
数据库操作
用的mysql,新建了一个数据库testlogin,然后新建了表user,结构如下
搭建PHP服务器
主要是负责接收android端的账号密码,通过查询操作mysql表
首先在HBuilder中新建了一个WBE项目,然后新建了一个conn.php,用于连接数据库1
2
3
4
5
6
7
8
9
$dbhost = "localhost:3306";
$dbuser="root";
$dbpass="";
$dbname="testlogin";
$conn = mysql_connect($dbhost, $dbuser, $dbpass) or die("connect error");
@mysql_select_db($dbname) or die("db error");
mysql_query("set names 'UTF-8'");
然后新建login.php用于接收表单数据并返回json数据1
2
3
4
5
6
7
8
9
10
11
12
13
14
15
16
17
include('conn.php');
$name = str_replace(" ", "", $_POST['username']);
$sql = "select * from user where '$name' = username";
$query = mysql_query($sql);
$result = mysql_fetch_array($query);
$response = array();
if (is_array($result)) {
if ($_POST['password'] == $result['password']) {
$response['success'] = 1;
} else {
$response['success'] = 0;
}
echo json_encode($response);
}
mysql_close($conn);
Android客户端
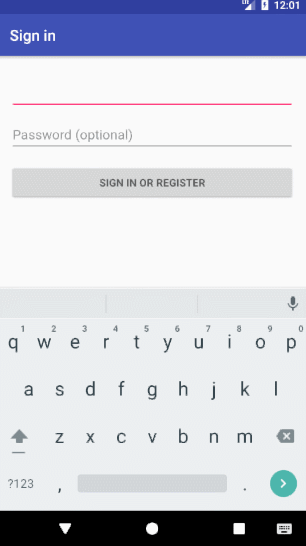
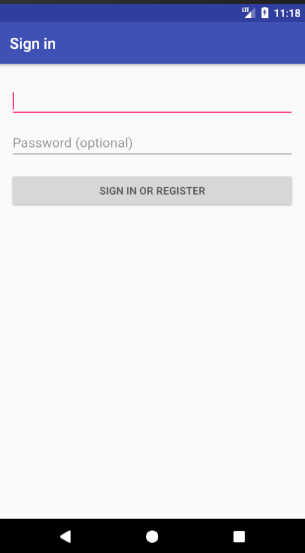
首先新建一个登录Acticity,布局如下,再新建一个Activity,用于登录成功跳转
我这里的布局代码1
2
3
4
5
6
7
8
9
10
11
12
13
14
15
16
17
18
19
20
21
22
23
24
25
26
27
28
29
30
31
32
33
34
35
36
37
38
39
40
41
42
43
44
45
46
47<LinearLayout
android:id="@+id/email_login_form"
android:layout_width="match_parent"
android:layout_height="wrap_content"
android:orientation="vertical">
<android.support.design.widget.TextInputLayout
android:layout_width="match_parent"
android:layout_height="wrap_content">
<EditText
android:id="@+id/et_username"
android:layout_width="match_parent"
android:layout_height="wrap_content"
android:maxLines="1"
android:singleLine="true" />
</android.support.design.widget.TextInputLayout>
<android.support.design.widget.TextInputLayout
android:layout_width="match_parent"
android:layout_height="wrap_content">
<EditText
android:id="@+id/et_password"
android:layout_width="match_parent"
android:layout_height="wrap_content"
android:hint="@string/prompt_password"
android:imeActionId="6"
android:imeActionLabel="@string/action_sign_in_short"
android:imeOptions="actionUnspecified"
android:inputType="textPassword"
android:maxLines="1"
android:singleLine="true" />
</android.support.design.widget.TextInputLayout>
<Button
android:id="@+id/btn_login"
style="?android:textAppearanceSmall"
android:layout_width="match_parent"
android:layout_height="wrap_content"
android:layout_marginTop="16dp"
android:text="@string/action_sign_in"
android:textStyle="bold" />
</LinearLayout>
接下来主要是要发送Post请求,这里用到了外部库volley,在app/gradle中dependencies中添加compile group: 'com.mcxiaoke.volley', name: 'library', version: '1.0.19'就好了
一开始使用volley时死活下不到jar包,还是gradle方便多了,推荐个网站传送门,这里能找到你想要的
最后是LoginActivity代码1
2
3
4
5
6
7
8
9
10
11
12
13
14
15
16
17
18
19
20
21
22
23
24
25
26
27
28
29
30
31
32
33
34
35
36
37
38
39
40
41
42
43
44
45
46
47
48
49
50
51
52
53
54
55
56
57
58
59
60
61
62
63
64
65
66
67
68
69
70
71
72
73public class LoginActivity extends AppCompatActivity {
// UI references.
private EditText mUsername;
private EditText mPassword;
private View mLogin;
protected void onCreate(Bundle savedInstanceState) {
super.onCreate(savedInstanceState);
setContentView(R.layout.activity_login);
mUsername = findViewById(R.id.et_username);
mPassword = findViewById(R.id.et_password);
mLogin = findViewById(R.id.btn_login);
mLogin.setOnClickListener(new OnClickListener() {
public void onClick(View view) {
new LoginHandle().run();
}
});
}
class LoginHandle implements Runnable {
public void run() {
final String username = mUsername.getText().toString();
final String password = mPassword.getText().toString();
String connectUrl = "http://10.0.2.2/PhpLoginDemo/login.php";
RequestQueue requestQueue = Volley.newRequestQueue(LoginActivity.this);
Response.Listener<String> listener = new Response.Listener<String>() {
public void onResponse(String s) {
String TAG = "LOGIN";
Log.e(TAG, s);
int retCode = 0;
try {
JSONObject jsonObject = new JSONObject(s);
retCode = jsonObject.getInt("success");
Log.d("retCode", retCode+"");
} catch (JSONException e) {
e.printStackTrace();
}
if (retCode == 1) {
startActivity(new Intent(LoginActivity.this, MainActivity.class));
} else {
Toast.makeText(LoginActivity.this,"用户名或密码错误!",Toast.LENGTH_SHORT).show();
}
}
};
Response.ErrorListener errorListener = new Response.ErrorListener() {
public String TAG = "LOG";
public void onErrorResponse(VolleyError error) {
Log.e(TAG, error.getMessage(), error);
}
};
StringRequest stringRequest = new StringRequest(Request.Method.POST, connectUrl, listener, errorListener) {
protected Map<String, String> getParams() throws AuthFailureError {
Map<String, String> map = new HashMap<>();
map.put("username", username);
map.put("password", password);
return map;
}
};
requestQueue.add(stringRequest);
}
}
}
最后不要忘记在Manifest中申明权限<uses-permission android:name="android.permission.INTERNET"/>
收工
至此,一个简单的Android登录功能就实现了,附上效果